I repainted these Iron Man nightlights
Tony received these two Iron Man nightlights ("light up wall art") several months ago. Neither of us felt they fit our style, partially because they were a bit cheap looking, so he decided to sell or discard them back in June when he was decluttering. I saw an opportunity, though, and decided to have a go at painting them before we got them out of the house.
Painting props is its own hobby and community within the hobbies/communities of cosplay, toy collecting, and replica building. Individuals will buy toys -- frequently cheap looking toys -- and enhance the quality to that of a piece of genuine art by redoing the mediocre machine-printed details by hand. I watch a lot of YouTube videos that touch on this. Most relevant is Cosplay Chris, a burly Aussie who makes his living creating costumes and pop culture collectables and letting fans watch his process. On Tested, former prop maker and nerd celebrity Adam Savage builds models as well. And then there's Punished Props and Odin Makes, both of which are channels which exclusively demonstrate custom prop fabrication. After watching these for years, I was curious to try some of the techniques that I've seen.
The process generally consists of priming, spray paining, and a weathering. I've watched Adam Savage dry brush silver onto corners many times, and he and Cosplay Chris both seem to wipe liquid shoe polish on and then off again just about everything to give it a greasy or dirty appearance. The neat thing about this is that it can work for a grimy item or a fairly clean one. Grimy props get slathered in shoe polish, but a light application will imperceptibly transform an unrealistically pristine item into one that has been well maintained but used in the real world. I decided to attempt a pretty heavy degree of weathering, as subtle usually requires more finesse then glaring.


I'm pleased. I'm not really into collectibles, but this practice will definitely get applied to props and other crafts. I think it worked out well!
Painting props is its own hobby and community within the hobbies/communities of cosplay, toy collecting, and replica building. Individuals will buy toys -- frequently cheap looking toys -- and enhance the quality to that of a piece of genuine art by redoing the mediocre machine-printed details by hand. I watch a lot of YouTube videos that touch on this. Most relevant is Cosplay Chris, a burly Aussie who makes his living creating costumes and pop culture collectables and letting fans watch his process. On Tested, former prop maker and nerd celebrity Adam Savage builds models as well. And then there's Punished Props and Odin Makes, both of which are channels which exclusively demonstrate custom prop fabrication. After watching these for years, I was curious to try some of the techniques that I've seen.
The process generally consists of priming, spray paining, and a weathering. I've watched Adam Savage dry brush silver onto corners many times, and he and Cosplay Chris both seem to wipe liquid shoe polish on and then off again just about everything to give it a greasy or dirty appearance. The neat thing about this is that it can work for a grimy item or a fairly clean one. Grimy props get slathered in shoe polish, but a light application will imperceptibly transform an unrealistically pristine item into one that has been well maintained but used in the real world. I decided to attempt a pretty heavy degree of weathering, as subtle usually requires more finesse then glaring.

I think the final products came out well. They don't look as good as the pros, and they don't look quite as good as I'd hoped based on the work I'd put in, but it's definitely an improvement, and I definitely learned a lot.

The original items were glossy and mono chromatic. That wouldn't do.

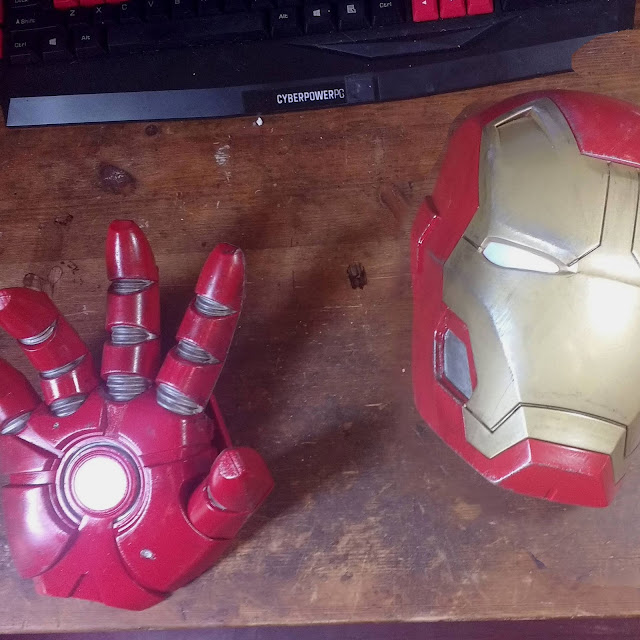
I painted the body with red spray paint and a gloss coat, then painted the joints silver with a brush. Then I scuffed it up.
When I started, I was much more excited to paint the helmet. I thought of the glove as a test piece to experiment with techniques to use on the helmet. Having finished, I think the glove looks much better than the helmet.

The thing I most admire about great props is the detail. Most props look better from a distance. Few hold up to a close look. But the really great ones are those that can be appreciated more up close.

I took this photo off of the internet because I forgot to take a before. Funnily, if you Google this, you'll see that the company that makes them has improved them quite a bit since they came out with this toy. This one is an "Avengers Assemble" light up wall decoration. The newer one is the "Iron Man 3" light up wall decoration. I had to find a representation of what I was starting with, because this one is much cheaper looking, and the other would severely diminish the transformation it underwent.

The gold / brassy spray paint helped, but it isn't magic. I wish the faceplate looked more like gold plating. The silver on the corners definitely does a lot to suggest that there is steel underneath a surface coating.

The line work around the eyes and mouth slit was bad before an application of shoe polish. It looked wrong, but an early attempt to color them looked too much alike a cartoon. Shoe polish made them dark, but in a slightly uneven way that feels just right.

The pock marks were created with a soldering iron. Then the red plastic that was exposed was painted silver, and some shoe polish was used to highlight the scuffing. I wish I'd gone crazy with this, and pocked up half the face.

Jack suggested a part where the whole paint layer has been scraped off. I sanded and then painted it silver, and then blended it into the red.
I'm pleased. I'm not really into collectibles, but this practice will definitely get applied to props and other crafts. I think it worked out well!
Comments
Post a Comment