ROV update #1: I'm building an ROV
I first started planning to build an underwater Remotely Operated Vehicle (ROV) around two years ago, shortly after leaving grad school. Oceanography had scratched an itch for the adventure of exploration. Earth scientists travel to the inhospitable places. They sail across oceans and climb mountains. They go to Antarctica. And using probes, they also send their presence even further. Into the abyssal ocean, into volcanoes, even onto alien planets. I didn't want to lose that excitement, and designing and building a submersible ROV was a way of continuing that exploration without the need of wider logistics out financing.
For over a year, this was purely an intention. Late in 2016, though I finally began to work on it seriously, although gradually.
I have some limited familiarity in the process of designing hardware to penetrate inaccessible places. I was in a satellite design club in college. Designing a mission to search for life is a common project in certain classes I've taken. And in grad school, all of our experiments depended on the collection of data or samples using robots sent several miles either up or down. That said: that amounts to tidbits, really.
Overview
The process begins with a set of specific goals, followed by an outline of the equipment needed to accomplish them. In my case, the foremost goal was to make a camera that I could pilot around underwater from the surface. Further goals included adding instruments that provided interesting and useful information, then adding some other functions to it that would be fun to use.
Goals drive the hardware needs, and the hardware design is broken into various 'subsystems'. This approach is similar to the one applied to most probes, whether it's a DIY ROV, a small satellite, or NASA's Mars Science Laboratory rover (MSL). In fact, the specific subsystems are pretty similar across these projects: Cameras, Data Acquisition, Telemetry, Communication, Mobility, Power.
The general form is going to be a box, with floats on the top and weights on the bottom to keep it oriented correctly. The computer and camera will be in a watertight housing, and a set of thrusters will be used to drive it around and steer. The whole thing will be controlled from the surface via an umbilical cable and powered by on-board batteries. This is a pretty tried-and-true approach. Consider these examples.

This is the back of the ROV Jason, which is one of the major workhorses of American oceanography. It's funded by the National Science Foundation (NSF) through the Woods Hole Oceanographic Institute. This was the ROV I was fortunate to get to work with.
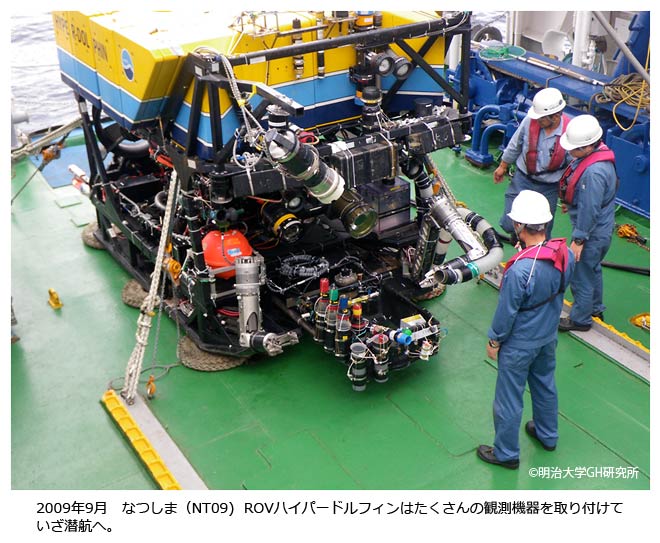
This is the ROV HYPER-DOLPHIN, seen from the front. It is the premier ROV of the Japan Agency for Marine-Earth Science and Technology (JAMSTEC). Extended in front is its retractable sampling basket, flanked on each side by robotic arms.

This is a commercial model used by Oceaneering Inc., which serves the oil and gas community. You can see the common features that ROVs have evolved toward.

This is the Blue ROV2, which is a commercial ROV sold by Blue Robotics that you can buy for $3,400.

This is the current crude drawing I'm using to plan the layout for my ROV. I'm planning to make a blocky roof out of either wood or specialized foam, and then attach two rigid plastic panels on the sides. A PVC tube with a clear window will hold the electronics and ducted thrusters will move it.
More updates to come.
Comments
Post a Comment